Sunday, April 26, 2020

How to Upgrade Ubuntu 18.04 to 20.04 LTS Focal Fossa right now via Debian way

You are supposed to change the /etc/apt/sources.list file and replace the name of your previous release. On 18.04.4 replace every instance of bionic with focal.  Just run simple 'sed' command performing replacement. 
  $ sudo sed -i 's/bionic/focal/g' /etc/apt/sources.list
Folder /etc/apt/sources.list.d/ in my case is empty, thus no replacements are required here

*Ubuntu Update and Ubuntu Upgrade*

Go ahead with Ubuntu dist upgrade, having the apt sources updated, run the Ubuntu upgrade.
  $ sudo apt update && sudo apt -y dist-upgrade
The upgrade might take a while. All packages on the system will be upgraded. When the Ubuntu upgrade appears to be done, reboot the systemWhen the system comes back up, run `hostnamectl` to make sure you are getting output like this

boris@boris-Standard-PC-4790:~$ hostnamectl
   Static hostname: boris-Standard-PC-4790
         Icon name: computer-vm
           Chassis: vm
        Machine ID: d5fdf2547e3942a9bd543303c92fcf30
           Boot ID: 3988bc0010dc486193305adea7d005ef
    Virtualization: kvm
  Operating System: Ubuntu 20.04 LTS
            Kernel: Linux 5.4.0-26-generic
      Architecture: x86-64


  Now verify 20.04 functionality via deployment Debian 10.3 KVM guest


   Right after KVM setup deploy Debian 10.3 guest


   Per my personal experience you might experience minor issues (on bare metal) dual booting Ubuntu instance with instance CentOS 8.X on the same box
  Post upgrade snapshot on bare metal ( Penryn's box has been 
  selected specially due to outdated CPU ) 


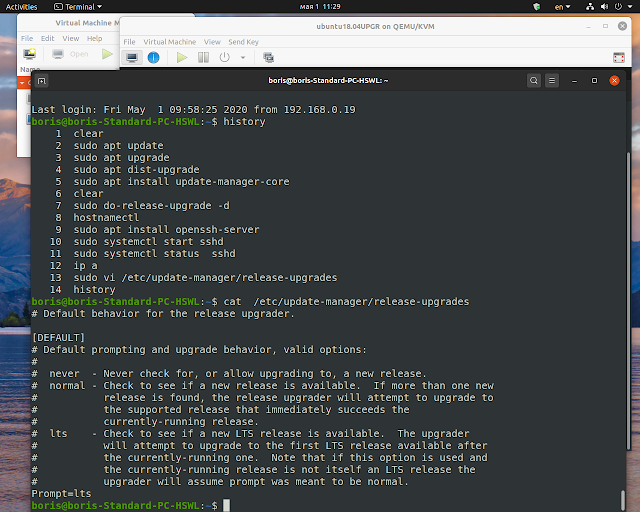
   Standard Ubuntu's upgrade works as follows
   $ sudo apt update 
   $ sudo apt upgrade
   $ sudo apt dist-upgrade
   $ sudo do-release-upgrade -d

  
    Before running `sudo do-release-upgrade -d` make sure

Friday, April 10, 2020

Setting up F32WKS KVM VirtHost with remote access

I just assembled the set of instructions placing F32 workstation on bare metal via linux-bridge to office LAN, traditional KVM Virthost packages download and install and polkit service successful authorization which requires one additional command as advised in corresponding Bugzilla record.

Right after setting up F32 WKS instance on bare metal run following commands to setup bridge br2 linked to physical interface enp3s0 which was used as normal connection to office LAN during install 
$ nmcli con show 
$ sudo nmcli con add type bridge ifname br2

$ sudo nmcli con add type bridge-slave ifname \        
     enp3s0 master br2 
$ sudo reboot
At this point make sure that bridge br2 has been setup 
as expected via `ip a`.

1: lo: <LOOPBACK,UP,LOWER_UP> mtu 65536 qdisc noqueue state UNKNOWN group default qlen 1000
    link/loopback 00:00:00:00:00:00 brd 00:00:00:00:00:00
    inet 127.0.0.1/8 scope host lo
       valid_lft forever preferred_lft forever
    inet6 ::1/128 scope host 
       valid_lft forever preferred_lft forever
2: enp3s0: <BROADCAST,MULTICAST,UP,LOWER_UP> mtu 1500 qdisc fq_codel master br2 state UP group default qlen 1000
    link/ether 52:54:00:a1:cd:7e brd ff:ff:ff:ff:ff:ff
3: br2: <BROADCAST,MULTICAST,UP,LOWER_UP> mtu 1500 qdisc noqueue state UP group default qlen 1000
    link/ether 0a:2a:1c:34:61:f9 brd ff:ff:ff:ff:ff:ff
    inet 192.168.0.24/24 brd 192.168.0.255 scope global dynamic noprefixroute br2
       valid_lft 86364sec preferred_lft 86364sec
    inet6 fe80::2395:213f:2b:9a46/64 scope link noprefixroute 
       valid_lft forever preferred_lft forever
4: virbr0: <NO-CARRIER,BROADCAST,MULTICAST,UP> mtu 1500 qdisc noqueue state DOWN group default qlen 1000
    link/ether 52:54:00:0c:e8:a7 brd ff:ff:ff:ff:ff:ff
    inet 192.168.122.1/24 brd 192.168.122.255 scope global virbr0
       valid_lft forever preferred_lft forever
5: virbr0-nic: <BROADCAST,MULTICAST> mtu 1500 qdisc fq_codel master virbr0 state DOWN group default qlen 1000

    link/ether 52:54:00:0c:e8:a7 brd ff:ff:ff:ff:ff:ff

$ sudo dnf -y install bridge-utils libvirt virt-install qemu-kvm
$ sudo dnf -y install virt-top libguestfs-tools
$ sudo systemctl start libvirtd
$ sudo systemctl enable libvirtd
$ sudo dnf -y install virt-manager
$ sudo systemctl start polkit
  Per https://bugzilla.redhat.com/show_bug.cgi?id=1437933
Successful ssh authorization also requires on recent Fedoras releases
$ sudo usermod --append --groups libvirt `whoami`


On the side hosting clients virtualization software
establish ssh trusting connection to 192.168.0.24
boris@boris-System-Product-HSW:~$  ssh-keygen -t rsa
Generating public/private rsa key pair.
Enter file in which to save the key (/home/boris/.ssh/id_rsa):
Enter passphrase (empty for no passphrase):
Enter same passphrase again:
Your identification has been saved in /home/boris/.ssh/id_rsa
Your public key has been saved in /home/boris/.ssh/id_rsa.pub
The key fingerprint is:
SHA256:zCXSpc9btGuSExhcCkjq03NQtbdmtUAkQhMp4bQX2is
  boris@boris-System-Product-HSW
The key's randomart image is:
+---[RSA 3072]----+
|   .++O+o.=           |
|   +o=.B O             |
|  . =.+ O + o          |
| . . o = O = o          |
|  o E o S B +          |
|   . +   o = .             |
|          = o                |
|           +                  |
|                               |
+----[SHA256]-----+
boris@boris-System-Product-HSW:~$ ssh-copy-id -i ~/.ssh/id_rsa.pub boris@192.168.0.24
/usr/bin/ssh-copy-id: INFO: Source of key(s) to be installed: "/home/boris/.ssh/id_rsa.pub"
/usr/bin/ssh-copy-id: INFO: attempting to log in with the new key(s),
to filter out any that are already installed
/usr/bin/ssh-copy-id: INFO: 1 key(s) remain to be installed --
if you are prompted now it is to install the new keys
boris@192.168.0.24's password:
    Number of key(s) added: 1
Now try logging into the machine, with:   "ssh 'boris@192.168.0.24'" and check to make sure that only the key(s) you wanted were added. 


Now you are all set